After I packaged it though, I came up with another design I wanted to have. Wanna try it out? Just click in the image to open it up big and save at full size. Enjoy!
8.29.2012
new in the shop - try before you buy!
I just added this new kit to my shop and I kind of love it (it's the Elvis Costello fan in me.)
8.28.2012
why yes, I do scrapbook
Remember way back yesterday when I posted this inspiration spread:
and said I was going to scrapbook. Well, I DID. Shockingly, I enjoyed it and love the results...no matter how simple it may be :)
and said I was going to scrapbook. Well, I DID. Shockingly, I enjoyed it and love the results...no matter how simple it may be :)
Digital elements are Studio Calico Central High Printables.
8.27.2012
eating this week (and, a winner!)
I've sort of fallen off the menu sharing bandwagon, eh? I'm still doing it but I've been so neglectful in sharing. I'll get to that in a minute though. First, the winner of the Ella giveaway!
Congratulations Kyky! Please email me and I'll get you the details. You're going to love the class!
So, for our menu this week we have:
Monday sesame tofu + asparagus
Tuesday potato tacos (these are yummy but need a little more crunch...so, I'll add some roasted corn ;)
Wednesday southwest black bean salad (recipe via foodie Mel...I'm going to try replacing the mango with nectarine though)
Thursday honey jalapeno roasted squash, salad, bread
Friday lentil loaf, potatoes, veg
Saturday taco salad
Sunday boy birthday party = pizza
And finally, I saw this spread from Inside Out magazine (via their blog) and was so drawn to the simplicity of that right hand side.
I know it's simple (classic!) I know it's been done a thousand times. But, I still love it. And need a kick in the ass to make a page. So today, I WILL make a page based on that layout. And you will too, won't you? If you do, link me up, I'd love to see where the inspiration takes you! I'll share mine tomorrow :)
8.23.2012
eBook giveaway: Meaningful Minis
Fellow scrapbooker and corn lover, Elizabeth, has graciously allowed me to share a giveaway with one of you. She's recently released a new Ella eBook, Meaningful Minis, and it is fantastic!
So many amazing tips for different "vehicles" for your mini album photos. So many great ideas for themes and topics. So many little and big moments captured. I'm inspired to create and not much has done that for me lately.
AND, I have an extra eBook to share with one of you! Just let me know in the comments what your next mini book adventure will be and I'll choose one winner on Monday. And I'll leave you with this quote from the class. Which I adore.
Peace and minis forever.
Want to see the contents? Yeah you do.
AND, I have an extra eBook to share with one of you! Just let me know in the comments what your next mini book adventure will be and I'll choose one winner on Monday. And I'll leave you with this quote from the class. Which I adore.
Peace and minis forever.
8.22.2012
a tutorial: quick and dirty brushes
So you scrapbook. You aren't a digital scrapbooker per se, but there are so many rad digital kits out there that you're thinking maybe, just maybe, you'd like to learn a little something so you can print stuff out to use on your regular paper pages. Or add some pizzazz to a photo before you print it. There are a zillion places on the web that can help you out so I'm not going to claim to be the expert but maybe you landed here; maybe you want something quick and dirty; maybe you just like me and want to see what I have to say on the subject.
When I first started scrapbooking digitally, I stayed away from brushes because they *seemed* difficult. They aren't though. Promise.
Typically, when you download a digital kit that includes brushes, the images come in two formats: an abr file and as png images. There is a reason for that! The abr file can be loaded into your editing program (either temporarily or permanently) and used like a digital stamp. If the abr file isn't compatible with your editing program, you can create and save your own brushes that will be compatible by using the png images.
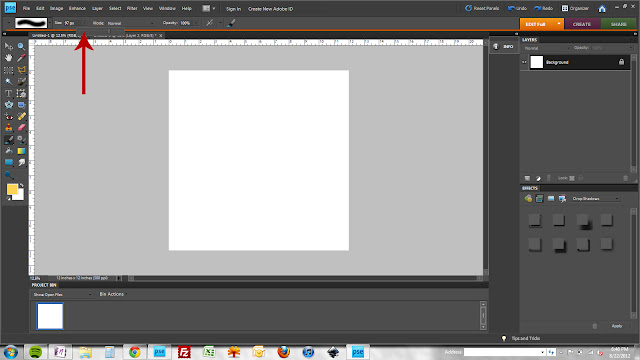
So first off, do you know where your brush tools are located? Keep in mind that I'm using PSE so while Photoshop CS* will be similar, it's not going to be identical.
And I know you want to try out your new skills, right? I create this quick brush set of arrows + numbers. Great for using on your pages or for creating journaling cards or photo overlays. Grab them here! And show me how you use them (please!)
When I first started scrapbooking digitally, I stayed away from brushes because they *seemed* difficult. They aren't though. Promise.
Typically, when you download a digital kit that includes brushes, the images come in two formats: an abr file and as png images. There is a reason for that! The abr file can be loaded into your editing program (either temporarily or permanently) and used like a digital stamp. If the abr file isn't compatible with your editing program, you can create and save your own brushes that will be compatible by using the png images.
So first off, do you know where your brush tools are located? Keep in mind that I'm using PSE so while Photoshop CS* will be similar, it's not going to be identical.
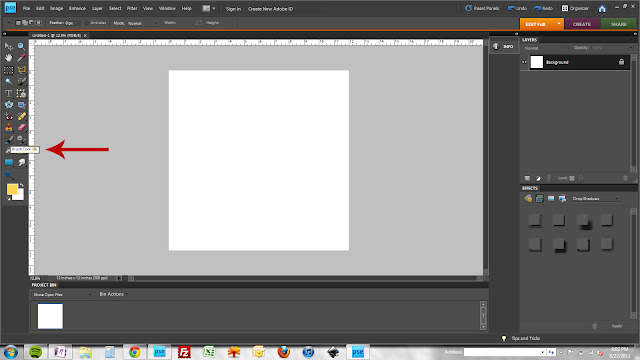 |
| here's your brush tool...the one that looks like a brush. click on it. or, just hit your "B" key! |
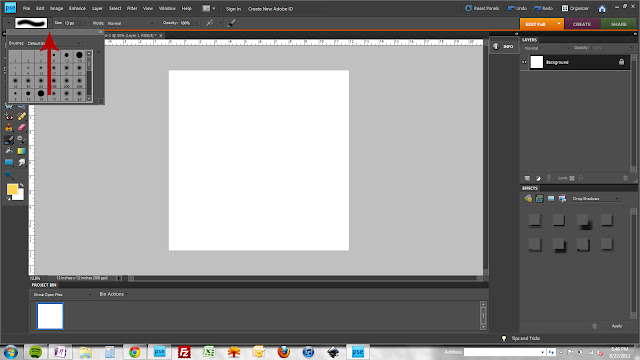 |
| once your brush tool is activated, you have a whole new toolbar up top! the first drop down is your brush selector. |
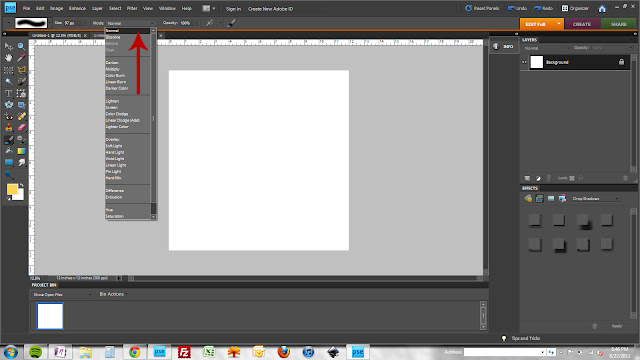 |
| third drop down = mode. these options are just like your layer mode options in your layers palette. |
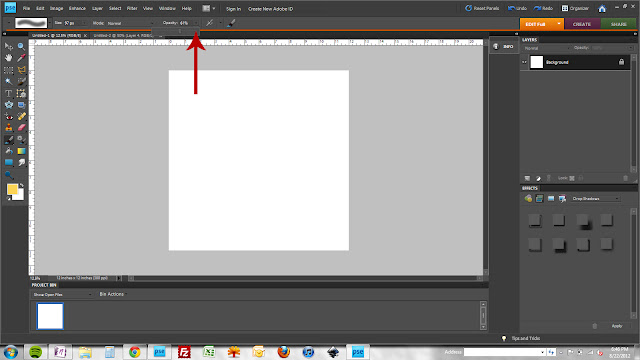 |
| finally, opacity. this is the opacity that your image will "stamp" at. |
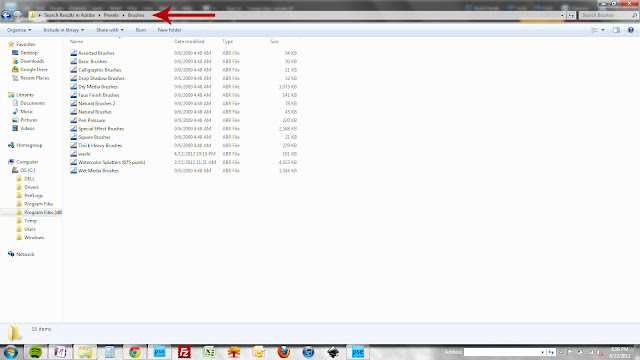
Now, let's talk about permanently loading your abr file. This means the brush set is always available in your brushes menu (but can slow processing speed a bit.)
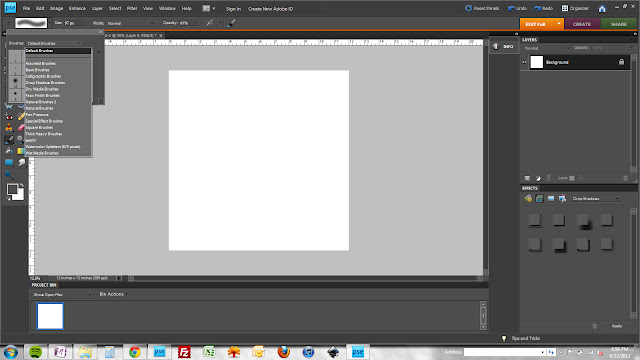 |
| once you save the abr file to your brushes folder, the brush set should show up in your default brush list (if elements is already open, you'll probably need to close and re-open it) |
Now, let's talk about temporarily loading brushes. This is the method I typically use (that is, when I use the abr file vs the png file)
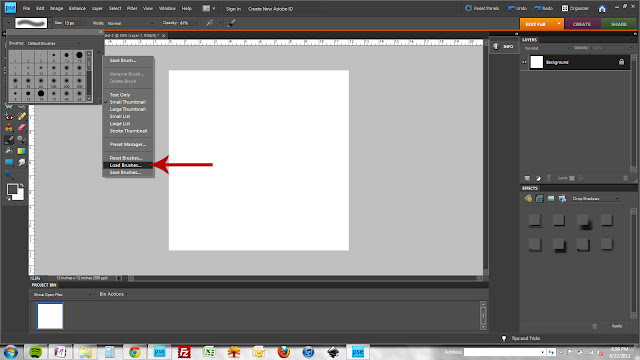 |
| with your brush tool active, click the little double arrow to the right of the brushes box and select load brushes |
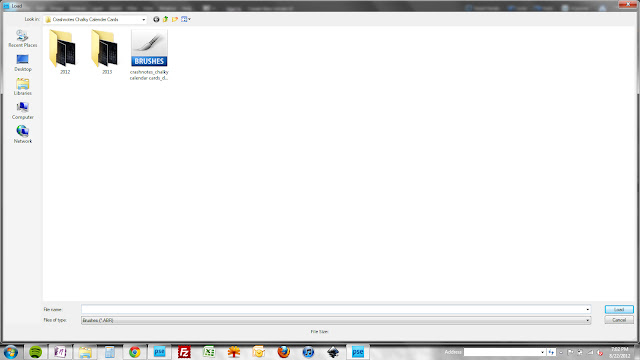 |
| find your abr file (it's easy - the one that says BRUSHES in giant letters ;) |
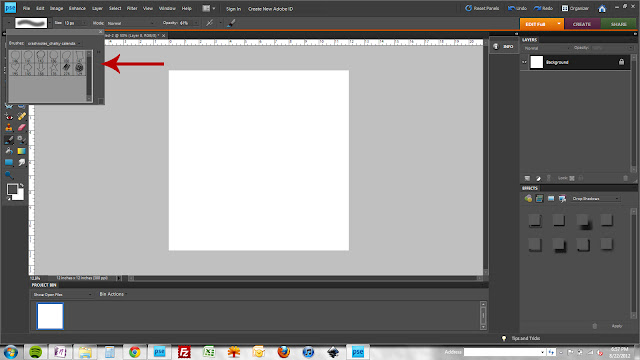 |
| your brush set will switch to your loaded set of images |
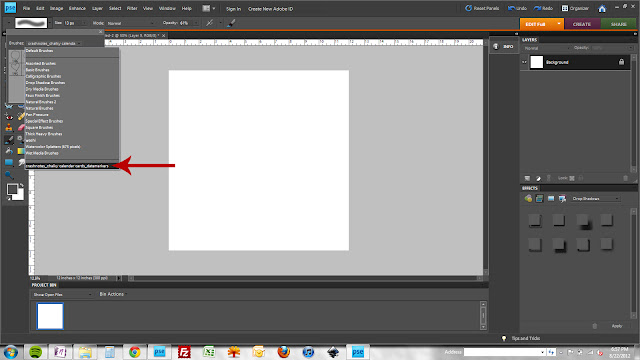 |
| if you click your brush selector drop down, you'll find your temporarily loaded set of brushes at the bottom of the list |
Finally, lets talk about using the png file to create and save your own brushes. Keep in mind that you can save your very own designs in this same manner! (you can use jpegs, pngs, whatever...as long as the selection area is within the 2500 x 2500 px max size)
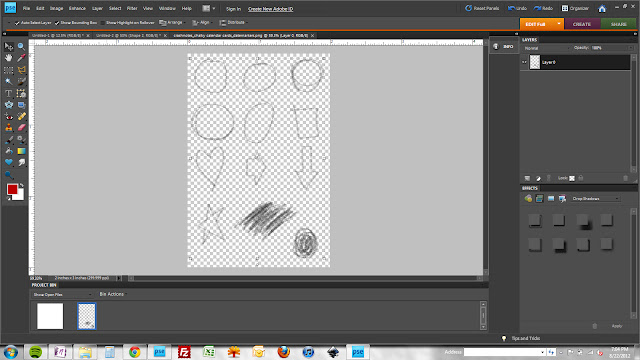 |
| open up your png file |
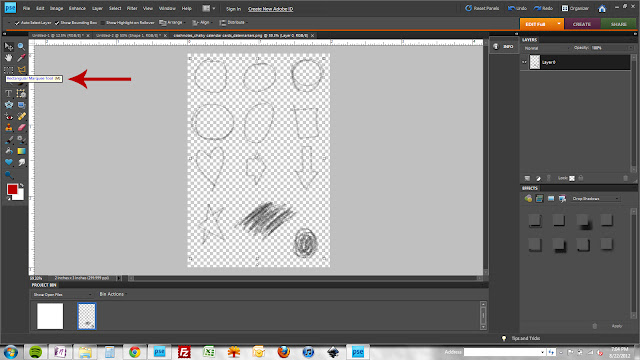 |
| choose your rectangular marquee tool (T) |
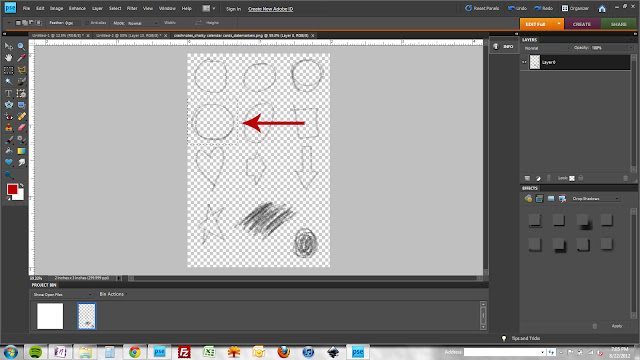 |
| draw a selection around the image you want to convert to a brush |
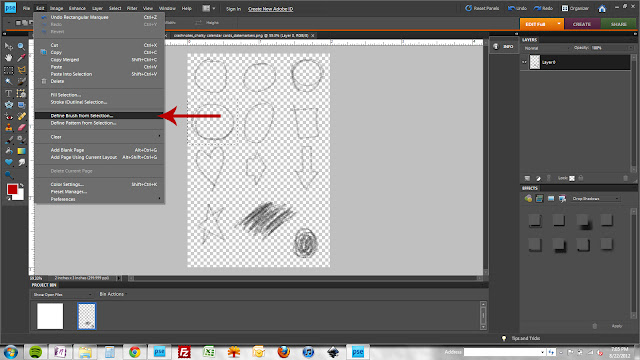 |
| select edit > define brush from selection |
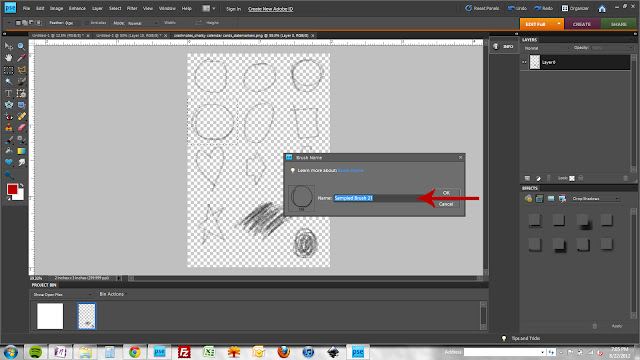 |
| get fancy and name your brush if you feel the need |
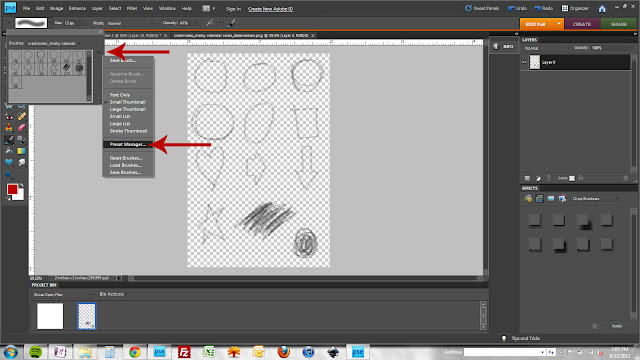 |
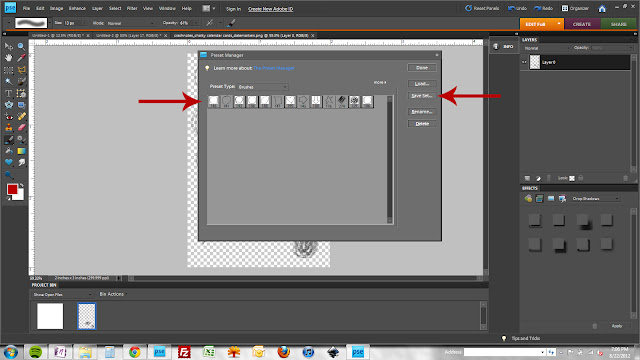
| repeat the previous select/define brush steps for each image. now we're gonna save them - weee! activate your brush tool (B,) click the little double arrow and then choose preset manager |
And I know you want to try out your new skills, right? I create this quick brush set of arrows + numbers. Great for using on your pages or for creating journaling cards or photo overlays. Grab them here! And show me how you use them (please!)
8.20.2012
letting you in on a secret
Bacon.
It's the gateway meat, right? At the top of the list of "oh, I could never give up _____" when people find out I'm a vegetarian. And yeah, I really thought I would miss it. But in the 2.5 years since we stopped eating meat, I haven't! Yes, pleasantly surprised by that.
But guess what? We have discovered a pretty happy surprise. An unexpected food preparation that does a pretty good job subbing for bacon in recipes that really just cry out for that bit of fatty, salty goodness.
Corn. Yup.
Toss with a little olive oil to coat. Spread on a pan. A generous salt and pepper. Roast at 450° for around 30 minutes or so until you have a nice mix of golden brown and black pieces. Give it a couple of stirs so the bits around the edges that get really crispy don't turn to complete charcoal. Pure deliciousness mixed into soups and salads. A little bit sweet. A little bit fatty with oil. A little bit salty. A little bit crispy and a little bit chewy. All the things that use to make bacon so irresistible. Not exactly bacon but pretty damn good in anything that would benefit from bacon.
Last night, we had it with this tomato chowder. I made some adjustments...a little more potato, a bit less tomato. Vegetable broth and I added some barley as well. The chowder was decent but the corn bits really made the difference. This corn soup is the recipe that turned us onto the roasted corn. It's amazingly delicious. If you're only going to make one corn-bacon soup, make that one ;)
Bacon? Not necessary but still, a pretty great flavor.
8.15.2012
tutorial: using patterned paper templates in png format
I've been working on repackaging some of my older kits and slowly adding them to my etsy shop interspersed with the new stuff. In repacking my Chevol paper, I decided to include the png template for creating a patterned chevron paper. I love how easy it is to create custom colors with a png template and wanted to show how quickly it can be done.
 |
| open your digital png file |
 |
| add a new layer above the pattern layer |
 |
| using your Paint Bucket Tool (K), fill the new layer with your desired color |
 |
| add another new layer *below* your pattern layer |
 |
| again, using your paint bucket tool, fill this new layer with your secondary color |
 |
| to flatten your image for use in your next project, select layer>flatten image and save with a new name |
8.13.2012
sharing an nerdy alphabet
I may be the *only* one excited to put this alphabet to use but that's OK :)
I started this ages ago with the intention of developing it into a full-blown old school design type of kit; but that didn't happen (so many of the things I share here had their start as the seed for a full-blown kit that never see the light of day.)
If you like it and think you can use it, grab it here. (And FYI, this comes as a single png file. If you need helping figuring out how to use it, the tutorial I posted the other day should help!)
Have a great week!
8.11.2012
tutorial: using a png file with multiple images
I've slowly been working on creating new digital kits, paper items and knit items for my etsy shop and finally added the first couple yesterday. I thought sharing a tutorial for using a png file with multiple images might be helpful.
I'm using this digital set for the tutorial. In addition to the cards, it includes a set of labels in a single file.
I'm using this digital set for the tutorial. In addition to the cards, it includes a set of labels in a single file.
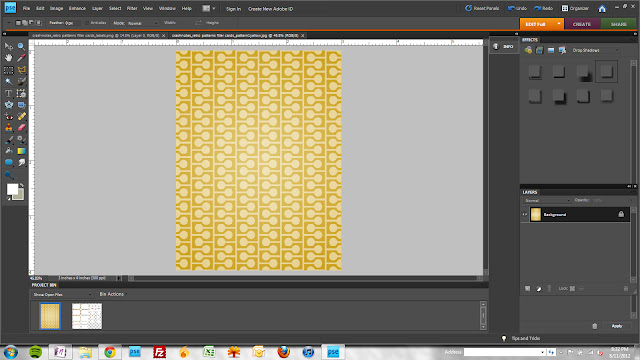 |
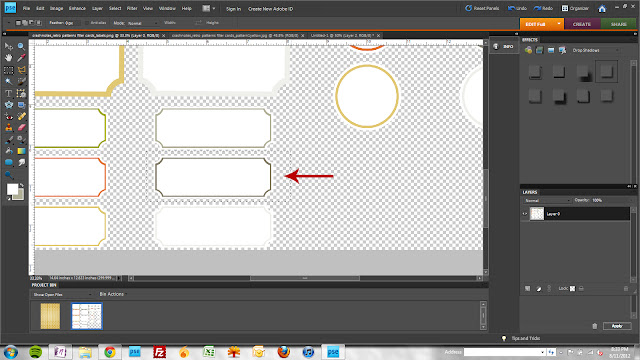
| Open your selected card file and label png file. |
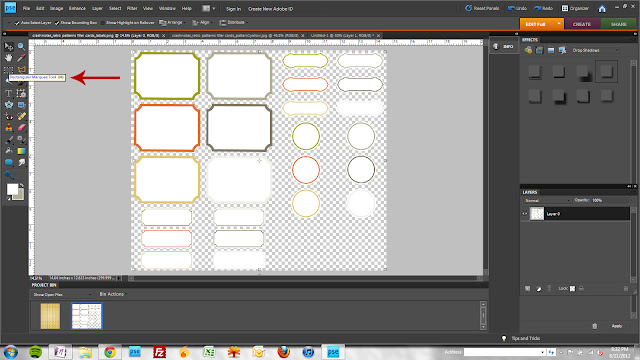 |
| Choose the Rectangular Marquee Tool (or, simply press "M") |
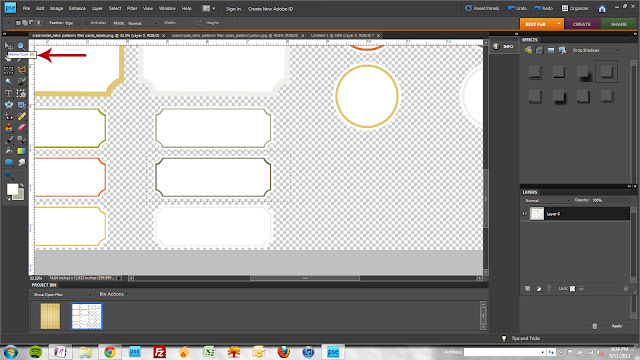 |
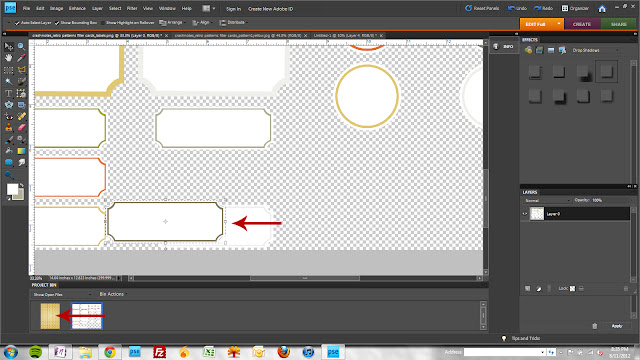
| Once your selection is made, switch to your Move Tool ("V") |
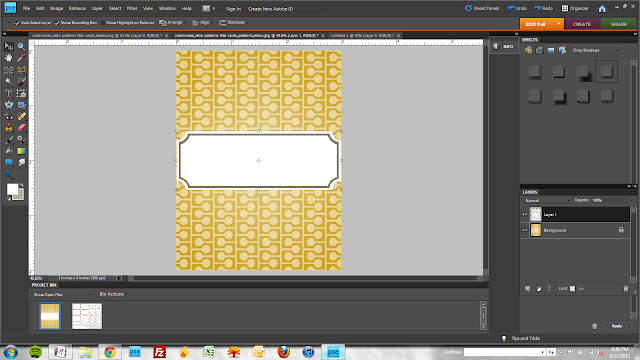 |
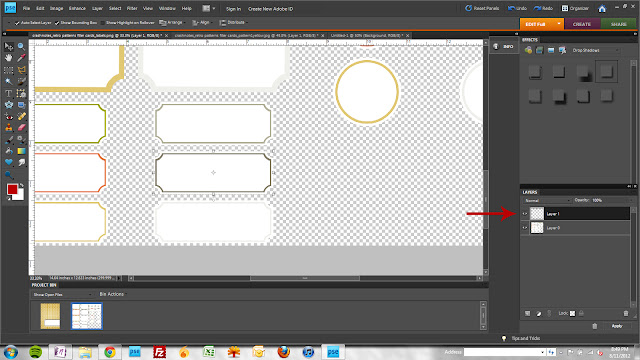
| Your label will be positioned around the center point of the card on a new layer. |
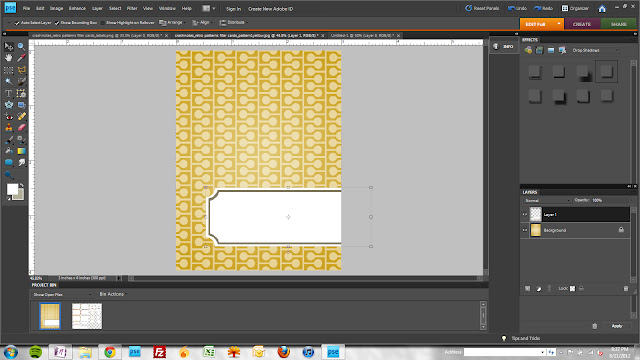 |
| Now you can position the label, |
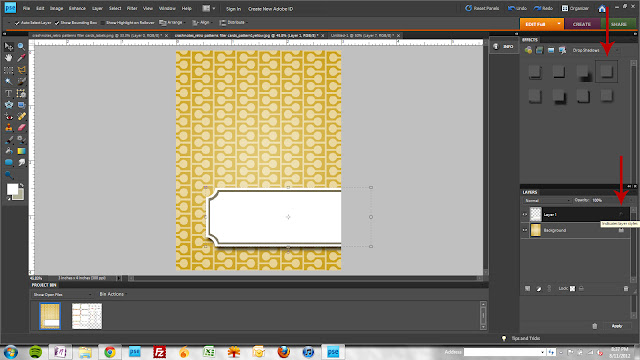 |
| add a shadow (double click the layer styles icon to the right of your label layer to adjust the shadow settings) |
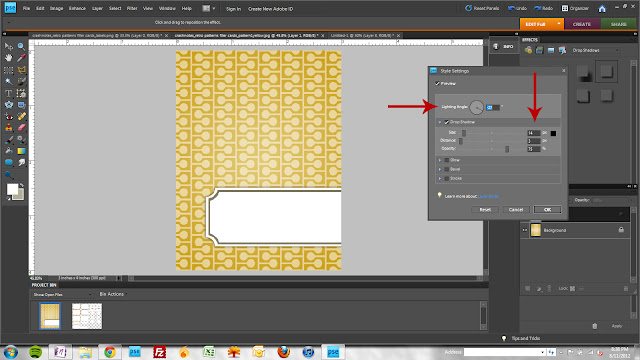 |
| and play with your lighting angle, shadow size and distance until you're satisfied. Now, you can add text if you want or simply print and add your photos, handwritten notes and embellishments! |
Subscribe to:
Posts (Atom)


